
[CentOS] Linux HAProxy로 Load Balancing 하기 [HTTP / HTTPS / DNS]
[CentOS] Linux HAProxy로 Load Balancing 하기 [HTTP / HTTPS / DNS]
[구성도] 1. HAProxy HTTP LB 1.1) HAProxy 설치 yum -y install haproxy - HAProxy를 설치한다. 1.2) HAProxy 구성 vi /etc/haproxy/haproxy.cfg - 아래의 설정값을 그대로 입력한다. 기존의 cfg에서 LB에 필요한 부분만 구성되었
a-gyuuuu.tistory.com
- HAProxy를 통하여 HTTP(L7) LB를 구성했다. 이번에는 LB에 대한 결과 및 통계를 알아보고, L4 LB를 살펴본다.
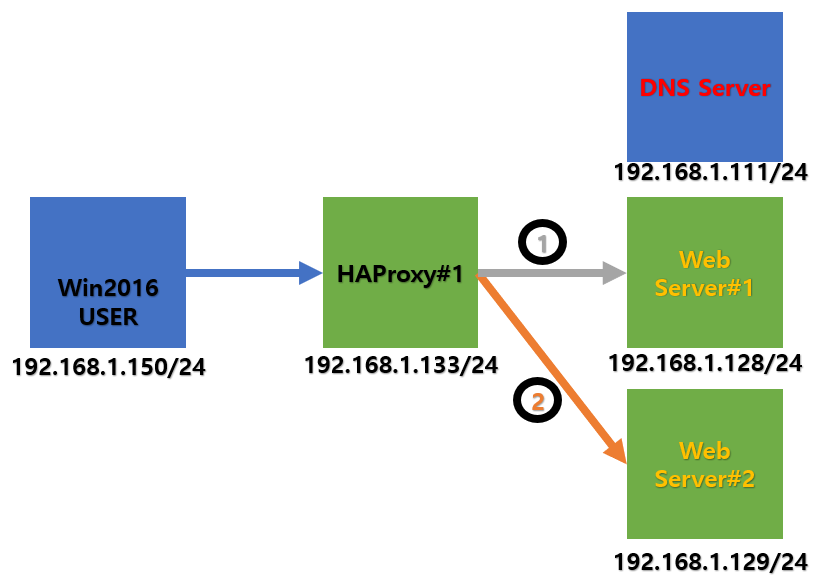
[구성도]
1. HAProxy 통계 확인
1.1) HAProxy 설정
vi /etc/haproxy/haproxy.cfg
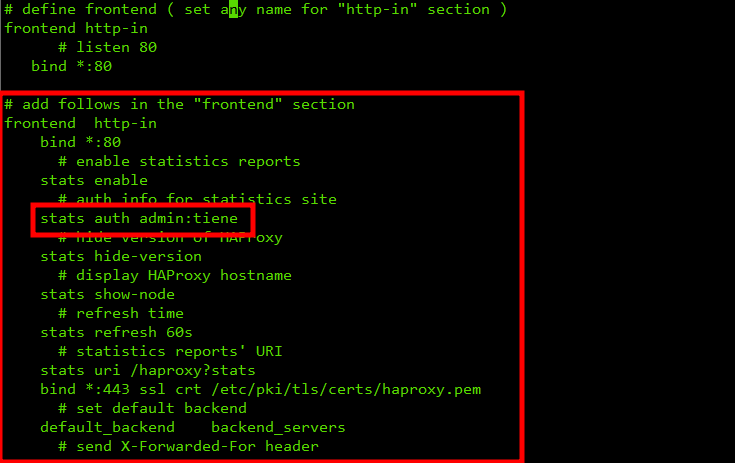
- 아래의 내용을 붙여넣는다. 중간에, 접속 ID와 P/W를 입력한다.
# add follows in the "frontend" section
frontend http-in
bind *:80
# enable statistics reports
stats enable
# auth info for statistics site
stats auth admin:tiene
# hide version of HAProxy
stats hide-version
# display HAProxy hostname
stats show-node
# refresh time
stats refresh 60s
# statistics reports' URI
stats uri /haproxy?stats
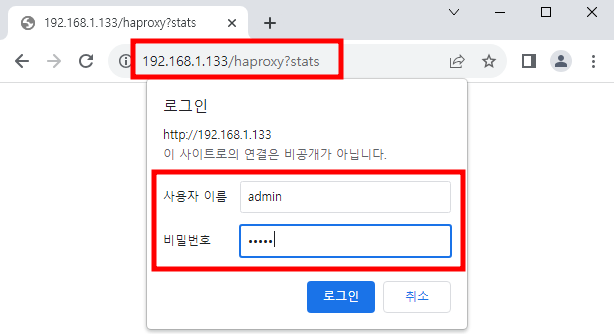
1.2) HAProxy 접속
- 사진과 같이 주소창에 입력하면, 로그인을 하기 위한 계정을 요구한다. 설정할 때 넣은 계정 정보를 입력하여 접속한다.
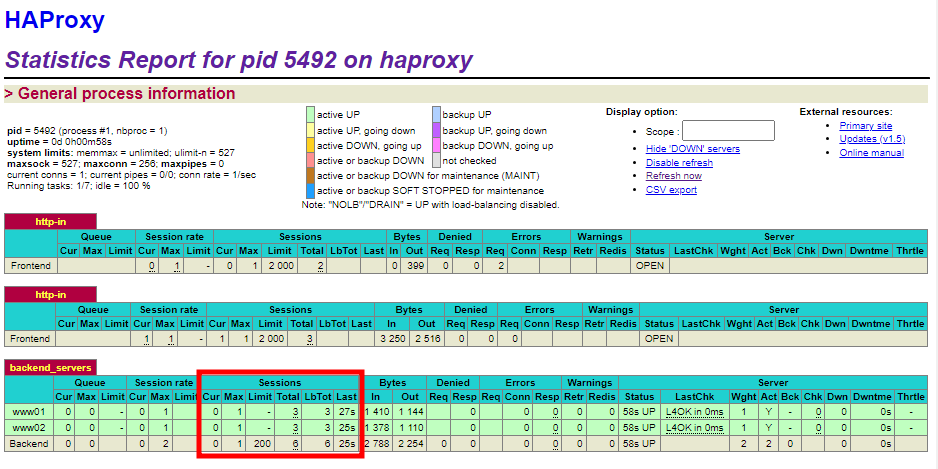
- 접속하면 Backend_servers라는 항목이 있다. HAProxy가 Frontend에서 받은 요청을 전달받는 곳이다. HAProxy에 접근할 때마다 올라간다.
2. HAProxy L4 LB
2.1) L4 추가 설정
vi /etc/haproxy/haproxy.cfg
- 다음과 같이 DB Server의 IP를 입력한다.
global
log 127.0.0.1 local2 info
chroot /var/lib/haproxy
pidfile /var/run/haproxy.pid
maxconn 256
maxsslconn 256
user haproxy
group haproxy
daemon
defaults
# set "mode tcp" for Layer4
mode tcp
log global
timeout connect 10s
timeout client 30s
timeout server 30s
# define frontend and backend servers
frontend mysql-in
bind *:3306
default_backend backend_servers
backend backend_servers
balance roundrobin
server db01 192.168.1.128:3306 check
server db02 192.168.1.129:3306 check

2.2) DB 구성 및 접속 확인
- DB를 적절하게 구성하고 접속해본다.
mysql -u root -p -h 192.168.1.133 TEST -e "select * from table01;"
- 다음과 같이, Roundrobin 방식으로 결과값을 알 수 있다.

참고 : https://www.server-world.info/en/note?os=CentOS_7&p=haproxy&f=3
CentOS 7 : HAProxy : Refer to the Statistics#1 : Server World
# enable statistics reports stats enable # auth info for statistics site stats auth admin:adminpassword # hide version of HAProxy stats hide-version # display HAProxy hostname stats show-node # refresh time stat
www.server-world.info
'IT > ㄴ Linux' 카테고리의 다른 글
| [CentOS] Zabbix 모니터링 서버 설치하기 [1/2] (0) | 2023.09.15 |
|---|---|
| [CentOS] Linux HAProxy HA 구성하기 [HA Auth 방식 변경 / keepalived.conf] (0) | 2023.09.12 |
| [CentOS] Linux HAProxy로 Load Balancing 하기 [HTTP / HTTPS / DNS] (0) | 2023.09.11 |
| [CentOS] Linux SNMP 사용하기 [SNMP Tester / PRTG] (0) | 2023.09.07 |
| [CentOS] Linux _default/Domain/IN: bad zone 오류 해결하기 [DNS / A Record] (0) | 2023.08.29 |